When you want to adjust a product in your menu, you can do this directly from the back office.
Finding a product
- Go to Menu in the Store overview.
- On the left side you will see all product groups, and in the middle you see the same overview.
- By clicking on a product group on the left, the group will appear at the top in the middle column.
- Inside each product group you can see the list of products.
- To adjust a product, click Wijzigen (Edit) on the right side of the product.
When you click Edit, a new window opens where you can see all the options that can be adjusted for this product.
Sections of the product editor
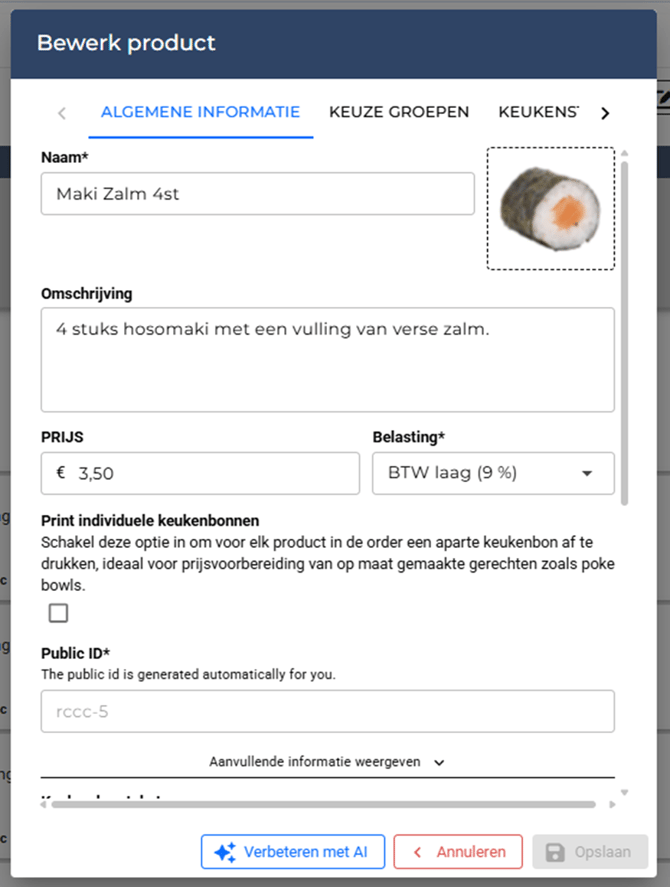
General information: Basic details such as name, description, price, tax, and image.
In this tab, you can adjust the main details of a product. Everything you set here determines how the product is displayed in your POS system and on your website.
Fields and functions:
-
Name*
Here you enter the product name, for example Maki Salmon 4pcs.
The name will be shown in the POS system, on the website, and on receipts. -
Image
You can add or change a product image.
This image appears in the website menu and, depending on settings, on POS system screens. -
Description
Here you describe the product, for example: 4 pieces of hosomaki with a filling of fresh salmon.
The description is visible to customers on the website or online ordering environment. -
Price
Set the sales price of the product here.
Example: €3.50. -
Tax (VAT)
Select the VAT rate that applies to this product.
For food, this is usually the low VAT rate (9%), but it may vary depending on the product (for example, alcohol = high rate). -
Print individual kitchen receipts
If you check this option, this product will receive a separate kitchen receipt for every order.
Useful for dishes that are custom-made, such as sushi bowls or salads. -
Public ID
This ID is automatically generated by the system.
It is used for integrations (for example with external systems such as delivery platforms).
You cannot adjust this field manually.
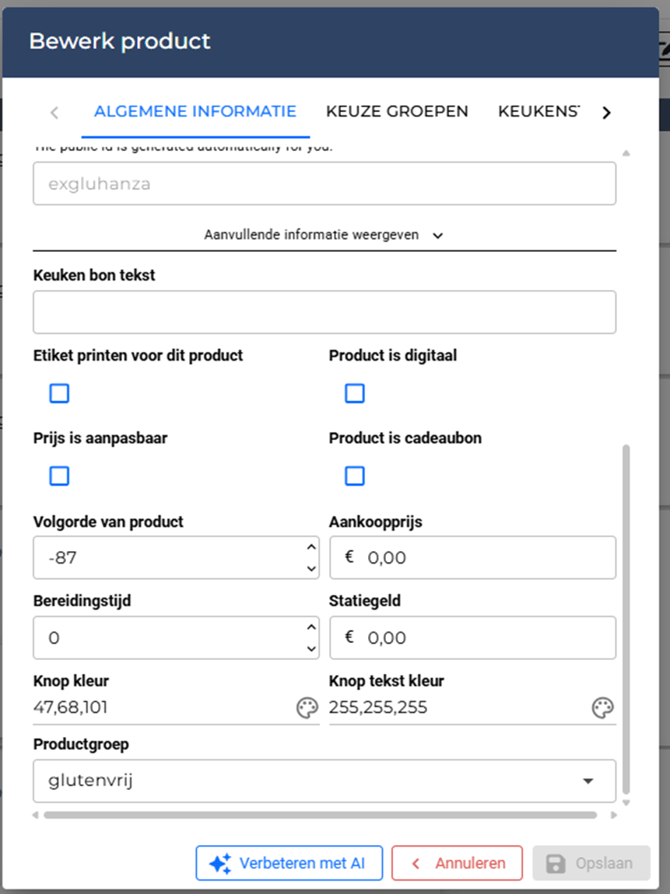
Additional information
Fields and functions:
-
Kitchen receipt text
Here you can enter an alternative name or text that will be printed on the kitchen receipt.
Useful if you want to use a shorter name for the kitchen than the full product name. -
Print label for this product
Check this option if labels need to be printed for this product.
Useful for takeaway or delivery (e.g., drinks or packaged meals). -
Product is digital
Use this if the product is not a physical item but digital (for example, a download or digital credit). -
Price is adjustable
This allows the cashier to manually change the price during the sale.
Handy for items sold by weight or for promotions that are not set up as standard. -
Product is gift card
Mark this if the product is a gift card.
This allows the system to apply special logic (such as balance tracking). -
Product order
This defines the position of the product within the product group.
The lower the number, the higher the product will appear in the list. -
Purchase price
Here you can enter the product’s purchase cost.
This is used for margin and profit calculations in reporting. -
Preparation time
You can add a default preparation time (in minutes).
This can be used to inform customers of waiting times or for kitchen scheduling. -
Deposit (Statiegeld)
If a deposit applies (for example, bottles or packaging), you can enter it here.
The amount will be automatically added at checkout. -
Button color & Button text color
Here you can set the color of the product button in the POS.
You can adjust both the background color of the button and the text color, making the product easier to recognize visually. -
Product group
Select which product group this product belongs to.
This determines where the product will be displayed in the menu (for example: Sushi, Drinks, Desserts).
- Keuze groepen (Choice groups): Add or edit choice groups linked to the product.

- Keukenstations (Kitchen stations): Decide at which kitchen station(s) the product appears.

- Kenmerken van de website (Website properties): The upselling regions, where you can offer a product additionally.

- Weekdagen (Weekdays): Configure availability on specific days of the week.

- Verkoopkanalen (Sales channels): Select where the product is available (POS, website, delivery apps).

- Alergenen (Allergens): Add allergen information for customer visibility.

- Labels: Assign specific labels to organize products.

- Beschikbaarheid (Availability): Set availability for a product on specific days or hours.

Activation through settings
Before you can use certain features in the product editor, they first need to be activated in the settings. Examples of these include sales channels, allergens, or quick product codes. If these options are not enabled in the settings, they will not be visible or available in the product editor. Therefore, it’s important to first check the settings and make sure the required features are turned on, so you can apply them later when editing a product.